redhat

All posts tagged redhat

How to setup the NTP service in RHEL7

Published October 27, 2014 by unixminx

Install the NTP package:

# yum install -y ntp

Activate the NTP service at boot:

# systemctl enable ntpd

Start the NTP service:

# systemctl start ntpd

The NTP configuration is in the /etc/ntp.conf file.

To quickly synchronize a server, type:

# systemctl stop ntpd
# ntpdate ntp.internode.on.net
 5 Jul 10:36:58 ntpdate[2190]: adjust time server 95.81.173.74 offset -0.005354 sec
# systemctl start ntpd

Using autofs to mount a LDAP authenticated home directory

Published October 27, 2014 by unixminx

To make this guide as straight forward as possible, I will skip the process of setting up an OpenLDAP server. The process to complete this is listed here.

Install NFS on the LDAP Server

We need to install NFS on the LDAP server. Note: it’s not required to have the LDAP server and the NFS server on the same machine, it’s only easier.

The first step is to install all the necessary packages for NFS. Once these packages are installed, each package needs to be enabled and started.

# yum -y install portreserve quota rpcbind nfs4-acl-tools.x86_64 nfs-utils.x86_64
# systemctl enable rpcbind
# systemctl start rpcbind

# systemctl enable nfs-server
# systemctl start nfs-server

# systemctl enable nfs-lock
# systemctl start nfs-lock

# systemctl enable nfs-idmap
# systemctl start nfs-idmap

# systemctl enable nfs-idmap
# systemctl start nfs-idmap

We now need to update the /etc/exports file.

# vi /etc/exports
/home/guests 192.168.56.105(rw,sync)

Once the config file is saved, we will now need to export the file.

# exportfs -avr
exporting 192.168.56.105:/home/guests

Ensure that iptables/firewalld allow communication using NFS.

Setup the LDAP client

The first step is to install openldap-clients, nss-pam-ldapd, autofs and nfs-utils.

# yum install -y openldap-clients nss-pam-ldapd autofs nfs-utils

Lets enable and start the autofs daemon.

# systemctl enable autofs
# systemctl start autofs

I’m also modifying the hosts file to include a mapping for instructor.example.com which will point to 192.168.56.104.

# cat /etc/hosts
192.168.56.104 instructor.example.com

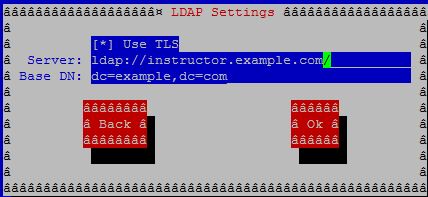
We’ll now connect the LDAP client up to our OpenLDAP server.

# authconfig-tui

authconfig-1

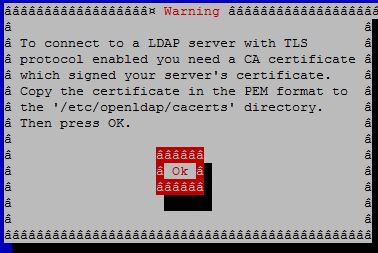
authconfig-2

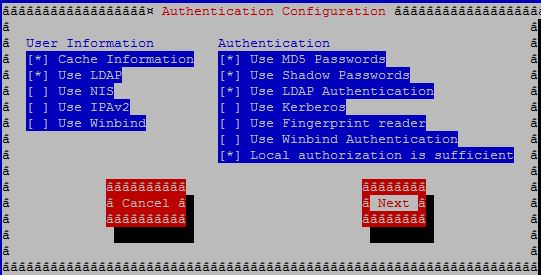
authconfig-3

DO NOT CLICK ON OK, just yet!

Open a separate SSH session to the client and cd to /etc/openldap/cacerts/.

# cd /etc/openldap/cacerts/

We’re now going to copy across the certificate from the LDAP server to this directory.

# wget http://instructor.example.com/cert.pem .

Switch back to the original SSH session with authconfig-tui open. Press Ok.

Restart the host.

# shutdown -r now

Once the host has started up, run the following getent command to ensure that you can successfully connect to the OpenLDAP server.

# getent passwd ldapuser02
ldapuser02:x:1001:1001:ldapuser02:/home/guests/ldapuser02:/bin/bash

We’ll verify that we can access the NFS share which we previously setup on the OpenLDAP + NFS server.

# showmount -e instructor.example.com
Export list for instructor.example.com:
/home/guests 192.168.56.106,192.168.56.105

Create a new indirect /etc/auto.guests map and paste the following line:

* -rw,nfs4 instructor.example.com:/home/guests/&

Add the following line at the beginning of the /etc/auto.master file:

/home/guests /etc/auto.guests

Restart autofs:

# systemctl restart autofs

Test the configuration:

# su - ldapuser02
Last login: Sun Oct 26 20:37:23 EDT 2014 on pts/0
[ldapuser02@localhost ~]$ ls -lrt
total 0
-rwxrwxrwx. 1 ldapuser02 ldapuser02 0 Oct 26 18:20 testfile

ヽ༼ຈل͜ຈ༽ノ

Connect RHEL7 to an open LDAP server

Published October 26, 2014 by unixminx

The LDAP server will be named instructor.example.com in this procedure.

Install the following packages:

# yum install -y openldap openldap-clients openldap-servers migrationtools net-tools.x86_64

Generate a LDAP password from a secret key (using redhat):

# slappasswd -s redhat -n > /etc/openldap/passwd

Generate a X509 certificate valid for 365 days:

# openssl req -new -x509 -nodes -out /etc/openldap/certs/cert.pem -keyout /etc/openldap/certs/priv.pem -days 365
Generating a 2048 bit RSA private key
.....+++
..............+++
writing new private key to '/etc/openldap/certs/priv.pem'
-----
You are about to be asked to enter information that will be incorporated
into your certificate request.
What you are about to enter is what is called a Distinguished Name or a DN.
There are quite a few fields but you can leave some blank
For some fields there will be a default value,
If you enter '.', the field will be left blank.
-----
Country Name (2 letter code) [XX]:
State or Province Name (full name) []:
Locality Name (eg, city) [Default City]:
Organization Name (eg, company) [Default Company Ltd]:
Organizational Unit Name (eg, section) []:
Common Name (eg, your name or your server's hostname) []:instructor.example.com
Email Address []:

Secure the content of the /etc/openldap/certs directory:

# cd /etc/openldap/certs
# chown ldap:ldap *
# chmod 600 priv.pem

Prepare the LDAP database:

cp /usr/share/openldap-servers/DB_CONFIG.example /var/lib/ldap/DB_CONFIG

Generate database files (don’t worry about error messages!):

# slaptest
53d61aab hdb_db_open: database "dc=my-domain,dc=com": db_open(/var/lib/ldap/id2entry.bdb) failed: No such file or directory (2).
53d61aab backend_startup_one (type=hdb, suffix="dc=my-domain,dc=com"): bi_db_open failed! (2)
slap_startup failed (test would succeed using the -u switch)

Change LDAP database ownership:

# chown ldap:ldap /var/lib/ldap/*

Activate the slapd service at boot:

# systemctl enable slapd

Start the slapd service:

# systemctl start slapd

Check the LDAP activity:

# netstat -lt | grep ldap
tcp        0      0 0.0.0.0:ldap            0.0.0.0:*               LISTEN     
tcp6       0      0 [::]:ldap               [::]:*                  LISTEN

To start the configuration of the LDAP server, add the cosine & nis LDAP schemas:

# cd /etc/openldap/schema
# ldapadd -Y EXTERNAL -H ldapi:/// -D "cn=config" -f cosine.ldif SASL/EXTERNAL authentication started
SASL username: gidNumber=0+uidNumber=0,cn=peercred,cn=external,cn=auth
SASL SSF: 0
adding new entry "cn=cosine,cn=schema,cn=config"
# ldapadd -Y EXTERNAL -H ldapi:/// -D "cn=config" -f nis.ldif SASL/EXTERNAL authentication started
SASL username: gidNumber=0+uidNumber=0,cn=peercred,cn=external,cn=auth
SASL SSF: 0
adding new entry "cn=nis,cn=schema,cn=config"

Then, create the /etc/openldap/changes.ldif file and paste the following lines (replace password with the previously created password):

To get the password which was previously generated:

# cat /etc/openldap/passwd
{SSHA}98bGGGdL+aj/TFVayaTsKj/xkfDZaYsRua1pge
dn: olcDatabase={2}hdb,cn=config
changetype: modify
replace: olcSuffix
olcSuffix: dc=example,dc=com

dn: olcDatabase={2}hdb,cn=config
changetype: modify
replace: olcRootDN
olcRootDN: cn=Manager,dc=example,dc=com

dn: olcDatabase={2}hdb,cn=config
changetype: modify
replace: olcRootPW
olcRootPW: {SSHA}98bGGGdL+aj/TFVayaTsKj/xkfDZaYsRua1pge

dn: cn=config
changetype: modify
replace: olcTLSCertificateFile
olcTLSCertificateFile: /etc/openldap/certs/cert.pem

dn: cn=config
changetype: modify
replace: olcTLSCertificateKeyFile
olcTLSCertificateKeyFile: /etc/openldap/certs/priv.pem

dn: cn=config
changetype: modify
replace: olcLogLevel
olcLogLevel: -1

dn: olcDatabase={1}monitor,cn=config
changetype: modify
replace: olcAccess
olcAccess: {0}to * by dn.base="gidNumber=0+uidNumber=0,cn=peercred,cn=external,cn=auth" read by dn.base="cn=Manager,dc=example,dc=com" read by * none

Send the new configuration to the slapd server:

# ldapmodify -Y EXTERNAL -H ldapi:/// -f /etc/openldap/changes.ldif SASL/EXTERNAL authentication started
SASL username: gidNumber=0+uidNumber=0,cn=peercred,cn=external,cn=auth
SASL SSF: 0
modifying entry "olcDatabase={2}hdb,cn=config"
modifying entry "cn=config"
modifying entry "olcDatabase={1}monitor,cn=config"

Create the /etc/openldap/base.ldif file and paste the following lines:

dn: dc=example,dc=com
dc: example
objectClass: top
objectClass: domain

dn: ou=People,dc=example,dc=com
ou: People
objectClass: top
objectClass: organizationalUnit

dn: ou=Group,dc=example,dc=com
ou: Group
objectClass: top
objectClass: organizationalUnit

Build the structure of the directory service:

# ldapadd -x -w redhat -D cn=Manager,dc=example,dc=com -f base.ldif adding new entry "dc=example,dc=com"
adding new entry "ou=People,dc=example,dc=com"
adding new entry "ou=Group,dc=example,dc=com"

Create two users for testing:

# mkdir /home/guests
# useradd -d /home/guests/ldapuser01 ldapuser01
# passwd ldapuser01 Changing password for user ldapuser01.
New password: user01ldap
Retype new password: user01ldap
passwd: all authentication tokens updated successfully.
# useradd -d /home/guests/ldapuser02 ldapuser02
# passwd ldapuser02 Changing password for user ldapuser02.
New password: user02ldap
Retype new password: user02ldap
passwd: all authentication tokens updated successfully.

Go to the directory for the migration of the user accounts:

# cd /usr/share/migrationtools

Edit the migrate_common.ph file and replace in the following lines:

$DEFAULT_MAIL_DOMAIN = "example.com";
$DEFAULT_BASE = "dc=example,dc=com";

Create the current users in the directory service:

# grep ":10[0-9][0-9]" /etc/passwd > passwd
# ./migrate_passwd.pl passwd users.ldif
# ldapadd -x -w redhat -D cn=Manager,dc=example,dc=com -f users.ldif 
adding new entry "uid=ldapuser01,ou=People,dc=example,dc=com"
adding new entry "uid=ldapuser02,ou=People,dc=example,dc=com"
# grep ":10[0-9][0-9]" /etc/group > group
# ./migrate_group.pl group groups.ldif
# ldapadd -x -w redhat -D cn=Manager,dc=example,dc=com -f groups.ldif 
adding new entry "cn=ldapuser01,ou=Group,dc=example,dc=com"
adding new entry "cn=ldapuser02,ou=Group,dc=example,dc=com"

Test the configuration with the user called ldapuser01:

# ldapsearch -x cn=ldapuser01 -b dc=example,dc=com

Add a new service to the firewall (ldap: port tcp 389):

# firewall-cmd --permanent --add-service=ldap

Reload the firewall configuration:

# firewall-cmd --reload

Edit the /etc/rsyslog.conf file and add the following line:

local4.* /var/log/ldap.log

Restart the rsyslog service:

# systemctl restart rsyslog

Edit the hosts file on the server:

# cat /etc/hosts
192.168.56.106 instructor.example.com

LDAP Client configuration

Add the same hosts file entry on the client:

# cat /etc/hosts
192.168.56.106 instructor.example.com

Install the following packages:

# yum install -y openldap-clients nss-pam-ldapd

Run the authentication menu:

# authconfig-tui

Choose the following options:

- Cache Information
- Use LDAP
- Use MD5 Passwords
- Use Shadow Passwords
- Use LDAP Authentication
- Local authorization is sufficient

In the LDAP Settings, type:

Use TLS
ldap://instructor.example.com
dc=example,dc=com

Note: Don’t use TLS if you specify ldaps.

Put the LDAP server certificate into the /etc/openldap/cacerts directory when asked.

Open another terminal window, and  cd /etc/openldap/cacerts.

cd /etc/openldap/cacerts
wget http://instructor.example.com/cert.pem .

Close authconfig-tui.

Test the connection to the LDAP server (the ldapuser02‘s line of the /etc/passwd file should be displayed):

# getent passwd ldapuser02
ldapuser02:x:1001:1001:ldapuser02:/home/guests/ldapuser02:/bin/bash
Setting up a local NFS Server

Published October 24, 2014 by unixminx

On the NFS Server, we will need to install the following packages:

yum -y install portreserve quota rpcbind nfs4-acl-tools.x86_64 nfs-utils.x86_64
# service rpcbind start
# chkconfig rpcbind on
# service nfs start
# chkconfig nfs on

The next step is to make the physical mount point (in this example, it’s /ilovecoco). We then need to update the /etc/exports file.  Add the physical mount point we just created, and then add the IP address of the remote machine with any mapping options (in this example, we added rw,sync as mount options).

[root@memberserver ~]# mkdir /ilovecoco
[root@memberserver ~]# vi /etc/exports
[root@memberserver ~]# cat /etc/exports
/ilovecoco 192.168.56.102(rw,sync)

Make the export file active by issuing the following commands:

[root@memberserver ~]# exportfs -r
[root@memberserver ~]# exportfs -a

On the server, we can now verify that the NFS mount is active by issuing the following command:

[root@memberserver ~]# showmount -e
Export list for memberserver:
/ilovecoco 192.168.56.102

We can now try and access this NFS share from a remote host.

[root@master ~]# showmount -e 192.168.56.103
clnt_create: RPC: Port mapper failure - Unable to receive: errno 113 (No route to host)

The above error message is a result of the firewall blocking access. Firewall access now needs to be setup. For the purposes of testing, I enabled ALL ports on the firewall.

[root@localhost ~]# iptables -F
[root@localhost ~]# iptables -A INPUT -j ACCEPT
[root@localhost ~]# iptables-save
# Generated by iptables-save v1.4.21 on Wed Oct 22 19:29:57 2014
*nat
:PREROUTING ACCEPT [984:75513]
:INPUT ACCEPT [4:234]
:OUTPUT ACCEPT [1209:57593]
:POSTROUTING ACCEPT [1209:57593]
:OUTPUT_direct - [0:0]
:POSTROUTING_ZONES - [0:0]
:POSTROUTING_ZONES_SOURCE - [0:0]
:POSTROUTING_direct - [0:0]
:POST_public - [0:0]
:POST_public_allow - [0:0]
:POST_public_deny - [0:0]
:POST_public_log - [0:0]
:PREROUTING_ZONES - [0:0]
:PREROUTING_ZONES_SOURCE - [0:0]
:PREROUTING_direct - [0:0]
:PRE_public - [0:0]
:PRE_public_allow - [0:0]
:PRE_public_deny - [0:0]
:PRE_public_log - [0:0]
-A PREROUTING -j PREROUTING_direct
-A PREROUTING -j PREROUTING_ZONES_SOURCE
-A PREROUTING -j PREROUTING_ZONES
-A OUTPUT -j OUTPUT_direct
-A POSTROUTING -j POSTROUTING_direct
-A POSTROUTING -j POSTROUTING_ZONES_SOURCE
-A POSTROUTING -j POSTROUTING_ZONES
-A POSTROUTING_ZONES -o enp0s8 -g POST_public
-A POSTROUTING_ZONES -o enp0s3 -g POST_public
-A POSTROUTING_ZONES -g POST_public
-A POST_public -j POST_public_log
-A POST_public -j POST_public_deny
-A POST_public -j POST_public_allow
-A PREROUTING_ZONES -i enp0s8 -g PRE_public
-A PREROUTING_ZONES -i enp0s3 -g PRE_public
-A PREROUTING_ZONES -g PRE_public
-A PRE_public -j PRE_public_log
-A PRE_public -j PRE_public_deny
-A PRE_public -j PRE_public_allow
COMMIT
# Completed on Wed Oct 22 19:29:57 2014
# Generated by iptables-save v1.4.21 on Wed Oct 22 19:29:57 2014
*mangle
:PREROUTING ACCEPT [7214:4652078]
:INPUT ACCEPT [7212:4650926]
:FORWARD ACCEPT [0:0]
:OUTPUT ACCEPT [5282:434260]
:POSTROUTING ACCEPT [5312:439910]
:FORWARD_direct - [0:0]
:INPUT_direct - [0:0]
:OUTPUT_direct - [0:0]
:POSTROUTING_direct - [0:0]
:PREROUTING_ZONES - [0:0]
:PREROUTING_ZONES_SOURCE - [0:0]
:PREROUTING_direct - [0:0]
:PRE_public - [0:0]
:PRE_public_allow - [0:0]
:PRE_public_deny - [0:0]
:PRE_public_log - [0:0]
-A PREROUTING -j PREROUTING_direct
-A PREROUTING -j PREROUTING_ZONES_SOURCE
-A PREROUTING -j PREROUTING_ZONES
-A INPUT -j INPUT_direct
-A FORWARD -j FORWARD_direct
-A OUTPUT -j OUTPUT_direct
-A POSTROUTING -j POSTROUTING_direct
-A PREROUTING_ZONES -i enp0s8 -g PRE_public
-A PREROUTING_ZONES -i enp0s3 -g PRE_public
-A PREROUTING_ZONES -g PRE_public
-A PRE_public -j PRE_public_log
-A PRE_public -j PRE_public_deny
-A PRE_public -j PRE_public_allow
COMMIT
# Completed on Wed Oct 22 19:29:57 2014
# Generated by iptables-save v1.4.21 on Wed Oct 22 19:29:57 2014
*security
:INPUT ACCEPT [6204:4571149]
:FORWARD ACCEPT [0:0]
:OUTPUT ACCEPT [5282:434260]
:FORWARD_direct - [0:0]
:INPUT_direct - [0:0]
:OUTPUT_direct - [0:0]
-A INPUT -j INPUT_direct
-A FORWARD -j FORWARD_direct
-A OUTPUT -j OUTPUT_direct
COMMIT
# Completed on Wed Oct 22 19:29:57 2014
# Generated by iptables-save v1.4.21 on Wed Oct 22 19:29:57 2014
*raw
:PREROUTING ACCEPT [7241:4653776]
:OUTPUT ACCEPT [5282:434260]
:OUTPUT_direct - [0:0]
:PREROUTING_direct - [0:0]
-A PREROUTING -j PREROUTING_direct
-A OUTPUT -j OUTPUT_direct
COMMIT
# Completed on Wed Oct 22 19:29:57 2014
# Generated by iptables-save v1.4.21 on Wed Oct 22 19:29:57 2014
*filter
:INPUT ACCEPT [0:0]
:FORWARD ACCEPT [0:0]
:OUTPUT ACCEPT [17:1800]
:FORWARD_IN_ZONES - [0:0]
:FORWARD_IN_ZONES_SOURCE - [0:0]
:FORWARD_OUT_ZONES - [0:0]
:FORWARD_OUT_ZONES_SOURCE - [0:0]
:FORWARD_direct - [0:0]
:FWDI_public - [0:0]
:FWDI_public_allow - [0:0]
:FWDI_public_deny - [0:0]
:FWDI_public_log - [0:0]
:FWDO_public - [0:0]
:FWDO_public_allow - [0:0]
:FWDO_public_deny - [0:0]
:FWDO_public_log - [0:0]
:INPUT_ZONES - [0:0]
:INPUT_ZONES_SOURCE - [0:0]
:INPUT_direct - [0:0]
:IN_public - [0:0]
:IN_public_allow - [0:0]
:IN_public_deny - [0:0]
:IN_public_log - [0:0]
:OUTPUT_direct - [0:0]
-A INPUT -j ACCEPT
COMMIT
# Completed on Wed Oct 22 19:29:57 2014
[root@master ~]# showmount -e 192.168.56.103
Export list for 192.168.56.103:
/ilovecoco 192.168.56.102

Lets now try manually mapping up this mount using the mount command.

[root@master ~]# mkdir /ialsolovesnooki
[root@master ~]# mount 192.168.56.103:/ilovecoco /ialsolovesnooki
[root@master ~]# df -hk | grep /ialsolovesnooki
192.168.56.103:/ilovecoco   7022592 1447680   5574912  21% /ialsolovesnooki
[root@master ~]# ls -lrt /ialsolovesnooki
total 0
-rw-r--r--. 1 root root 0 Oct 23  2014 mycatsarethebest

Lets now get fancy and map this mount on demand using the autofs auto mounting daemon service. We’ll need to install autofs first.

[root@master ~]# yum -y install autofs
[root@master ~]# service autofs start
Redirecting to /bin/systemctl start  autofs.service
[root@master ~]# chkconfig autofs on
Note: Forwarding request to 'systemctl enable autofs.service'.

We also need to install nfs-utils and nfs4-acl-tools on the client host:

[root@localhost ~]# yum -y install nfs-utils.x86_64 nfs4-acl-tools.x86_64

/etc/auto.misc has several helpful examples which we will draw inspiration from to mount our NFS share. The line which we are interested in is the #linux line.

[root@slave /]# cat /etc/auto.misc
#
# This is an automounter map and it has the following format
# key [ -mount-options-separated-by-comma ] location
# Details may be found in the autofs(5) manpage
cd              -fstype=iso9660,ro,nosuid,nodev :/dev/cdrom
# the following entries are samples to pique your imagination
#linux          -ro,soft,intr           ftp.example.org:/pub/linux
#boot           -fstype=ext2            :/dev/hda1
#floppy         -fstype=auto            :/dev/fd0
#floppy         -fstype=ext2            :/dev/fd0
#e2floppy       -fstype=ext2            :/dev/fd0
#jaz            -fstype=ext2            :/dev/sdc1
#removable      -fstype=ext2            :/dev/hdd

Lets now edit the master mapping file.

[root@slave /]# vi /etc/auto.master
/meow /etc/auto.coco

It’s important to ensure that the filename begins in auto. It can end in anything, i.e. auto.duck.

[root@localhost meow]# vi /etc/auto.coco
reow          -ro,soft,intr           192.168.56.103:/ilovecoco

Restart autofs.

[root@localhost meow]# service autofs restart
Redirecting to /bin/systemctl restart  autofs.service

Now try and access the mount:

[root@localhost meow]# cd /
[root@localhost /]# cd meow
[root@localhost meow]# cd reow
[root@localhost reow]# ls -lrt
total 0
-rwxrwxrwx. 1 root root 0 Oct 22 19:57 mycatsarethebest

Reduce a Logical Volume online without any data loss

Published October 14, 2014 by unixminx

It’s possible to reduce the size of a logical volume without any data loss occurring.

The first step is to check the existing size of the logical volume:

[root@slave ~]# lvdisplay /dev/myvg/mylv
  --- Logical volume ---
  LV Path                /dev/myvg/mylv
  LV Name                mylv
  VG Name                myvg
  LV UUID                K31i4c-mJmI-mNhJ-CvkB-c38D-7wCd-I2erTM
  LV Write Access        read/write
  LV Creation host, time slave, 2014-10-13 20:01:22 -0400
  LV Status              available
  # open                 1
  LV Size                4.00 GiB
  Current LE             1024
  Segments               2
  Allocation             inherit
  Read ahead sectors     auto
  - currently set to     8192
  Block device           253:2

The current size is 4 GB, although we would like to change the size to 2 GB.

As a cautious measure, run fsck on the logical volume to ensure that the file system is in a consistent state.

[root@slave ~]# fsck /dev/myvg/mylv

We will now resize the file system to 2 GB.

[root@slave ~]# resize2fs /dev/myvg/mylv 2G

The final step is to reduce the logical volume using lvreduce.

[root@slave ~]# lvreduce /dev/myvg/mylv -L 2G
  WARNING: Reducing active and open logical volume to 2.00 GiB
  THIS MAY DESTROY YOUR DATA (filesystem etc.)
Do you really want to reduce mylv? [y/n]: y
  Reducing logical volume mylv to 2.00 GiB
  Logical volume mylv successfully resized

Verify the new logical volume size using lvdisplay.

[root@slave ~]# lvdisplay /dev/myvg/mylv
  --- Logical volume ---
  LV Path                /dev/myvg/mylv
  LV Name                mylv
  VG Name                myvg
  LV UUID                K31i4c-mJmI-mNhJ-CvkB-c38D-7wCd-I2erTM
  LV Write Access        read/write
  LV Creation host, time slave, 2014-10-13 20:01:22 -0400
  LV Status              available
  # open                 1
  LV Size                2.00 GiB
  Current LE             512
  Segments               1
  Allocation             inherit
  Read ahead sectors     auto
  - currently set to     8192
  Block device           253:2

Adding disk space to an existing Volume Group

Published October 13, 2014 by unixminx

In the situation where you have exhausted all of the disk space in a volume group, you can add additional disks to the volume group in order to remediate the situation.

Locate the additional disk using the fdisk -l command.

[root@slave ~]# fdisk -l
Disk /dev/sdd: 3221 MB, 3221225472 bytes, 6291456 sectors
Units = sectors of 1 * 512 = 512 bytes
Sector size (logical/physical): 512 bytes / 512 bytes
I/O size (minimum/optimal): 512 bytes / 512 bytes

The next step is to create a LVM partition using the above disk (/dev/sdd).

[root@slave ~]# fdisk /dev/sdd
  1. Type in n and press enter three times.
  2. Type in +2G and press enter.
  3. Type in t and press enter.
  4. Type in 8e and press enter.
  5. Type in w and press enter.
  6. Type in q and press enter.

Run partprobe to make the kernel aware of the disk changes.

[root@slave ~]# partprobe

Check the partition path by running fdisk -l.

[root@slave ~]# fdisk -l
Disk /dev/sdd: 3221 MB, 3221225472 bytes, 6291456 sectors
Units = sectors of 1 * 512 = 512 bytes
Sector size (logical/physical): 512 bytes / 512 bytes
I/O size (minimum/optimal): 512 bytes / 512 bytes
Disk label type: dos
Disk identifier: 0xeef01ba1
   Device Boot      Start         End      Blocks   Id  System
/dev/sdd1            2048     4196351     2097152   8e  Linux LVM

Create the physical volume using pvcreate.

[root@slave ~]# pvcreate /dev/sdd1
  Physical volume "/dev/sdd1" successfully created

We’re now going to add 2GB of space from the new /dev/sdd1 partition to the lvtestvolume volume group.

[root@slave ~]# vgextend lvtestvolume /dev/sdd1
  Volume group "lvtestvolume" successfully extended

Verify the size of the volume group by running vgdisplay lvtestvolume.

[root@slave ~]# vgdisplay lvtestvolume
  --- Volume group ---
  VG Name               lvtestvolume
  System ID
  Format                lvm2
  Metadata Areas        2
  Metadata Sequence No  3
  VG Access             read/write
  VG Status             resizable
  MAX LV                0
  Cur LV                1
  Open LV               1
  Max PV                0
  Cur PV                2
  Act PV                2
  VG Size               4.99 GiB
  PE Size               4.00 MiB
  Total PE              1278
  Alloc PE / Size       512 / 2.00 GiB
  Free  PE / Size       766 / 2.99 GiB
  VG UUID               wxeQ0N-ZboT-lN2s-CCeQ-zkbb-B24Q-Khh6NB

The disk space has now been made available to the volume group, however the logical volume needs to be extended in order to make use of the additional space.

[root@slave ~]# lvdisplay lvtestvolume
  --- Logical volume ---
  LV Path                /dev/lvtestvolume/data
  LV Name                data
  VG Name                lvtestvolume
  LV UUID                fwCnof-OoOu-8PNR-wPC2-LqBL-TQK6-DCZbiR
  LV Write Access        read/write
  LV Creation host, time slave, 2014-10-13 19:23:50 -0400
  LV Status              available
  # open                 1
  LV Size                2.00 GiB
  Current LE             512
  Segments               1
  Allocation             inherit
  Read ahead sectors     auto
  - currently set to     8192
  Block device           253:4

We can now use lvextend to add an additional 2GB of space to the lvtestvolume.

[root@slave ~]# lvextend -L +2G /dev/lvtestvolume/data
  Extending logical volume data to 4.00 GiB
  Logical volume data successfully resized

We can finally verify the disk space addition from using lvdisplay /dev/lvtestvolume/data or through using df -hk | grep /data.

[root@slave ~]# lvdisplay /dev/lvtestvolume/data
  --- Logical volume ---
  LV Path                /dev/lvtestvolume/data
  LV Name                data
  VG Name                lvtestvolume
  LV UUID                fwCnof-OoOu-8PNR-wPC2-LqBL-TQK6-DCZbiR
  LV Write Access        read/write
  LV Creation host, time slave, 2014-10-13 19:23:50 -0400
  LV Status              available
  # open                 1
  LV Size                4.00 GiB
  Current LE             1024
  Segments               2
  Allocation             inherit
  Read ahead sectors     auto
  - currently set to     8192
  Block device           253:4
[root@slave ~]# df -hk | grep /data
/dev/mapper/lvtestvolume-data   1998672   6144   1871288   1% /data

Mounting ISO files within RHEL

Published October 13, 2014 by unixminx

Download the ISO file using wget.

[root@memberserver ~]# cd tmp;wget http://cdimage.debian.org/debian-cd/7.6.0/multi-arch/iso-cd/debian-7.6.0-amd64-i386-netinst.iso

Create a directory which you will use to mount the ISO file to.

[root@memberserver ~]# mkdir /isodir

Edit the /etc/fstab as per the below entry:

[root@memberserver ~]# vi /etc/fstab
/tmp/debian-7.6.0-amd64-i386-netinst.iso /isodir iso9660 defaults,loop 0 0

Run partprobe to make the kernel aware of the disk changes and finally run mount -a to mount the ISO.

[root@memberserver ~]# partprobe
[root@memberserver ~]# mount -a
mount: /dev/loop0 is write-protected, mounting read-only
[root@memberserver ~]# df -hk | grep isodir
/dev/loop0               496640  496640         0 100% /isodir

Adding a gateway address

Published October 13, 2014 by unixminx

First, verify which connections are online.

[root@slave network-scripts]# nmcli con show --active
NAME         UUID                                  TYPE            DEVICE
CocoChopper  e8f14903-4b12-44b2-9e15-a9d47c720d14  802-3-ethernet  enp0s3
hostonly     febb8ba7-a989-40a7-8683-53388f70da39  802-3-ethernet  enp0s8

In /etc/sysconfig/network-scripts, there will be a ifcfg-CocoChopper file which will need to be modified.

[root@slave network-scripts]# cat ifcfg-CocoChopper
TYPE=Ethernet
BOOTPROTO=dhcp
DEFROUTE=yes
PEERDNS=yes
PEERROUTES=yes
IPV4_FAILURE_FATAL=no
IPV6INIT=yes
IPV6_AUTOCONF=yes
IPV6_DEFROUTE=yes
IPV6_PEERDNS=yes
IPV6_PEERROUTES=yes
IPV6_FAILURE_FATAL=no
NAME=CocoChopper
UUID=e8f14903-4b12-44b2-9e15-a9d47c720d14
DEVICE=enp0s3
ONBOOT=yes

We can now add the gateway address in the configuration file.

[root@slave network-scripts]# vi ifcfg-CocoChopper
TYPE=Ethernet
GATEWAY=10.0.2.254
BOOTPROTO=dhcp
DEFROUTE=yes
PEERDNS=yes
PEERROUTES=yes
IPV4_FAILURE_FATAL=no
IPV6INIT=yes
IPV6_AUTOCONF=yes
IPV6_DEFROUTE=yes
IPV6_PEERDNS=yes
IPV6_PEERROUTES=yes
IPV6_FAILURE_FATAL=no
NAME=CocoChopper
UUID=e8f14903-4b12-44b2-9e15-a9d47c720d14
DEVICE=enp0s3
ONBOOT=yes

Restart networking services and ping google.com to test connectivity.

[root@slave network-scripts]# service network restart
Restarting network (via systemctl):                        [  OK  ]
[root@slave network-scripts]# ping google.com
PING google.com (74.125.237.96) 56(84) bytes of data.

Restricting network access with iptables

Published October 13, 2014 by unixminx

The first thing is to install the iptables-services.x86_64 package.

[root@slave ~]# yum -y install iptables-services.x86_64

In this example, we will be blocking traffic from the 10.10.0.0/8 network.

[root@slave ~]# iptables -A INPUT -s 10.10.0.0/8 -j REJECT
[root@slave ~]# service iptables restart
Redirecting to /bin/systemctl restart  iptables.service

Verify that the network is being blocked by issuing the following command:

[root@slave ~]# iptables -L
Chain INPUT (policy ACCEPT)
target     prot opt source               destination
REJECT     all  --  10.0.0.0/8           anywhere             reject-with icmp-port-unreachable

How to enable IP forwarding in RHEL

Published October 12, 2014 by unixminx

To check whether or not IP forwarding is enabled, run the following command:

[root@slave ~]# sysctl -a | grep ip_forward
net.ipv4.ip_forward = 0

The 0 indicates that IP forwarding is currently disabled.

To switch IP forwarding on, the following command will need to be issued:

[root@slave ~]# sysctl -w net.ipv4.ip_forward=1
net.ipv4.ip_forward = 1